To Gnome Me Is To Love Me

This month’s challenge, hosted by Art Elements, is “To gnome me is to love me…”  A gnome challenge is just what I needed! I made a ceramic gnome for my daughter last Christmas, but then just before I was ready to fire it, I broke it’s hat off! So I promised my daughter I’d make a replacement, but I’d never gotten around to doing it – until now! I glued the hat back on the broken gnome so you could get an idea of how it was supposed to look.

collage 1

After I joined the Art Elements challenge, I made 3 new gnomes. However, I glaze and fire my ceramics at a community ceramics studio, which is closed now, due to Covid 19. So I’ll have to show the gnomes as just greenware (unfired clay). The other issue I had was that, other than a fettling knife, (a special knife for use in ceramics), all my tools were at my community studio. So these little guys are literally made by hand – only my hands, without any tools. They are a little rough, but I can clean them up once I can get back into the studio, before I kiln fire them.

collage 2

Two views of new gnome 1

collage 3

Two views of new gnome 2

And below is a photo of me smoothing the surface of the second gnome.

gnome pic 1a

These first two gnomes were made about a week ago and have been drying ever since. Then last night I made a third, larger gnome. Here he is in the beginning stages. He has a body and a nose, but nothing else, at that point.

gnome 4a

And here he is sort of complete. He needs to dry more and then get the details refined and the surface smoothed.

collage 4

Two views of new gnome 3

Thank you for visiting my blog and viewing my unfinished gnomes. Can’t wait to get some tools, glaze and fire them. Thanks also to Jenny Daves-Reazor and Art Elements for hosting this challenge.

This is a blog hop. Please visit the artists below to see their interpretations of the gnome challenge.

AE team:
Marsha
Cathy
Jen
Jenny
Lesley
Claire
Niky

Guests:
Tammy
Linda – You Are Here
Hope
Cat
Sarajo

Flower Art Challenge

This month’s challenge theme from the Art Elements blog is Flowers. Nothing inspires me more than flowers do. I love their many colors, shapes and textures. I have always been deeply moved, healed and inspired by the beauty in nature. We once had a home that had over 1,000 daffodils in the back field – my husband planted them over the years because he saw how much joy they brought me! 🙂

I make greeting cards with pressed, dried flowers. I photograph flowers. I design flowered jewelry and ceramic items and I love to arrange flowers. I adore flowers!

sunflower flower arrangement

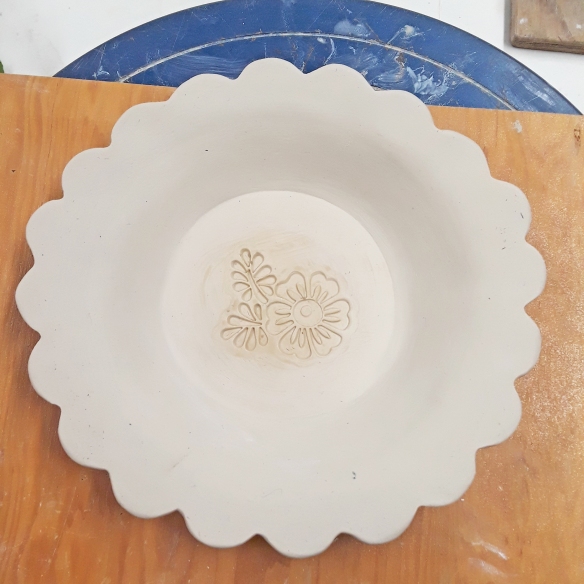
I have a number of different entries for this month’s Challenge, but several things are still works in progress. I was sick for a couple of weeks in July and didn’t get everything finished up. However, early in July, I made this bowl, with a floral motif in it.  It has now had its first kiln firing, but I haven’t had time to glaze and re-fire it. I am still pondering which glazes to use.

IMG_20190618_144933_214_3676

I have set myself a goal of having a booth at a large Art To Wear show next April. Judging will take place in January 2020  My goal (besides being juried in) is to have all my own ceramic jewelry in the show. This is a lofty goal, because I have tons of jewelry with art beads from other makers, but I haven’t done a lot of designing with my own ceramic components. Mostly I have just offered them for sale to jewelry designers. So I have my work cut out for me and I used this Art Elements challenge to jump start my efforts.

I made these yellow earrings early this month. They include my ceramic roses which I accented with lampwork glass by Third Eye Gypsys.

Flower Blog Hop 2

After making these earrings, I decided to make a bunch more roses to use for simple post earrings and necklaces. I haven’t had time to glaze them yet, but I plan to make them happy and colorful! These are the earring pairs.

Flower Blog Hop 6a

These are larger and will be used in necklaces.

Flower Blog Hop 7

Next I made some daisy post earring pairs.

Flower Blog Hop 3

These also have a larger version for necklaces.

Flower Blog Hop 4.jpg

Here’s another floral earring pair, in a more rustic style.

Flower Blog Hop 5

And a last minute necklace addition… I made this simple necklace this afternoon with a new pendant I made last week.

Big Bloom Necklace 2

Last of all, I want to share a floral “event” that took me by surprise this month. I posted some flower photographs on Instagram and Facebook. Shelly Turner, the owner of the OOAK Artisan Showcase gallery, in Rome, NY saw my photos and asked me to submit two of them to an upcoming show. The show is titled “Summer Afternoon” and it runs through August 4th. She sent me a photo of one of my pictures in the gallery.

67205094_1457014424440049_2677807990458810368_n

And here’s the other flower photo I submitted; a stunning purple poppy.

Purple Poppy

I would like to thank Art Elements for hosting this challenge, with special thanks to Marsha Neal Minutella who arranged it all. This is a blog hop so please take some time and look at the wonderful things people are creating for this theme. I invite you to visit the artists’ blogs and leave a friendly comment, (if you are having issues leaving comments, try using google chrome as your browser).
You can also see and participate yourself via social media by using the hashtags: #AEThemeChallenge and #AEFlowers

Here is a list of the Visiting Artists:
Alysen
Cat
Divya
Evie and Beth
Jill
Hope
Kathy
Linda
Louise
Martha
Melissa
Michelle
Rozantia
Sarah
Sarajo
Tammy

And the Art Elements Blog Contributors:
Caroline
Cathy
Claire
Jenny
Laney
Lesley
Marsha
Susan

linda-cursive

Linda Landig Jewelry


Brrr, Winter

Winter is here and many of us are shivering under layers of clothes.  But once you peel off your coat, scarf, hat and gloves, some wintery jewelry might just take the edge off the brrr.

Blue Snowflake Necklace 

This rustic necklace features a ceramic pendant by my friend Diana Ptaszynski, a handmade clasp that echoes the angles of the snowflake and gorgeous deep blue batik ribbon. Nobody will accuse you of being boring when you wear this unique artisan necklace!

blue snowflake necklace 1

blue snowflake necklace 2

Casual Snowflake Necklace

Perhaps you’d like something a little more subtle; something you can just slip over your head with a simple tee shirt or sweater. This necklace features my own handmade ceramic snowflake and a raku bead by Xaz Beads.

brown and white snowflake necklace 6

Let It Snow Earrings

I also have a couple of winter themed earrings in my shop.  These earrings have ceramic snowflakes by Bo Hulley and lampwork glass by my friends at Paradise Bead. All the wire is Sterling silver.  These are so pretty!

snowflake_earrings_3_0

Tranquil Snowflake Earrings

These are my favorite of the four shown here.  The lampwork beads by Sue Beads shimmer with a silvery iridescence and the artisan sterling silver snowflakes are exquisitely detailed. These will make your ears happy!

tranquil_snowflake_earrings_2_0

What do you like best about winter? I like walking in crunchy sounding snow. How about you?

I am always delighted to read your comments! Hope to hear from you.

linda-cursiveLinda Landig Jewelry

Art Elements Sunflower Challenge

Art Elements blog is hosting a Sunflower blog hop challenge today.  Participants have all agreed to create jewelry or other art forms with a sunflower theme.  I love sunflowers, so I hopped right in.

sunflower close up

I took this close-up photo of a sunflower I had in a floral arrangement I’d made.  I love the streaks of reddish-brown on the yellow petals.  To achieve that effect on my ceramic pendants I layered two specific glazes.  The top glaze crackles when layered over the reddish-brown glaze beneath, allowing some of that lower layer of color to bleed through. I was so pleased with this effect that I made a whole pile of sunflower pendants, just because I was having so much fun with them. As you can see, each one is a little different as I played with different aspects of the design.

Sunflower Pendants

I made one pendant that was a bit larger the those above and which had a big enough hole to accommodate some leather.  I used that pendant in my necklace for today’s challenge.

Sunflower Necklace 11

I attached the pendant to the leather with a simple larks head knot and above it I placed two hand enameled tubes that I believe were made by Mary Dodd.  The leather then connects to some Terra Cast copper rings with a nice surface texture. I love how the copper color echoes the browns in the pendant.

Sunflower Necklace 2

I added a short strand of vintage glass beads and peanut beads, that I suspended from the rings, as well.  When worn, they drape just on top of the leather and end about an inch or so above the pendant .  Leather cording finishes off the back of the necklace, which ends in a copper-colored lobster clasp.  This is a nice long necklace, which I could have made without a clasp, because it slips easily over the head.

Sunflower Necklace 6

I have one sunflower pendant listed on my website, but if you want more, just message me here or through my website.

Sunflower Pendant 2

My thanks to Sue and to Art Elements for hosting this fun summer challenge. This is a blog hop, so be sure to share the love with all these other great artists!

Guests

Alysen
Anita
Cat
Divya
Jill
Kathy
Linda You are here.
Linda
Mischelle
Norma
Raven
Sarajo
Tammy

AE Team

Caroline
Cathy
Claire
Jenny
Laney
Lesley
Sue

Use Your Own Stash Challenge

This month I’m playing along with the Art Elements‘ monthly challenge blog hop. January’s challenge was to create jewelry using components in our own stash.  All of us have accumulated sooooo many beads.  I know that my beading table has mounds of beads on it.

Work Table Januarary 2018

With the New Year beginning, it would be nice to clean this mess up and work on reducing my stash and putting it to good use in some finished jewelry! To that end, here’s what I have made so far.

Several years ago, I helped Genea Civello teach her first class at Bead Fest in Philadelphia.  She taught several projects using Wooly Wire in combination with her gorgeous lampwork glass.  As reimbursement for my assistance, I got to choose a number of her lampwork beads, including the pair I used in these earrings.  The copper headpins are by Handmade by JGL.

Eye Of The Storm earrings 2

I used some head pins from my stash to make the next pair of earrings.  I’m not certain whose heads pins these are.  Maybe Havana Beads, but I can’t say for sure.  These earrings are now living in Oaxaca, Mexico, with a friend of ours who is an anthropologist there.

Turquoise Drop Earrings

I made the following pair for my monthly blog post on Earrings Everyday.  They feature lampwork by Paradise Beads and OutWest Glass that I’ve had in my stash forever.  Jenelle and Daniel (of Paradise Beads) used to live in the same town I do.  The little orange beads date way back to that time.  They’ve lived in Todos Santos, Mexico for at least 3-4 years now, so that’s how long those beads have hung out in my stash!

Sunset In The Tropics earrings 3

Admittedly, this final pair of earrings only partially fits into this challenge.  The polymer clay components by Heather Powers of Humble Beads are brand new, but the beads I stacked above them have all hung out in my stash for a long time.

Teal Earrings 2

So there you have it – a month’s worth of stash reduction.  I have so much more stash to work through.  It’s a tough job, but someone has to do it….

This is a blog hop, so check out all these other stash reducing bead stars!

Guests:
Kelly Rodgers
Sarajo Wentling
Samantha Wescott
Kathy Lindemer
Patty Miller
Linda Landig
Renetha Stanziano
Art Elements:
Jenny Davies-Reazor
Jen Cameron
Claire Fabian
Sue Kennedy
Niky Sayers
Lindsay Starr

Linda cursiveLinda Landig Jewelry


Art Elements Component of the Month Reveal

Niky Sayers makes the most delightful clasps out of old coins. I’ve designed jewelry with her clasps before and was excited to throw my name in the hat to win one of her hare clasps this month.

Rabbit Clasp COM 1d.jpg

I am always inspired by autumn colors and textures.  It’s easy to picture hares hopping through fallen leaves while scoping out safe burrows for their winter retreats, (although, do hares only live in drier regions? Hmmm, I may have to look into that… )

ea46089b980127869abf8a3272268a75--autumn-fall-autumn-leaves

And that’s how the idea for this bracelet came to be.  I paired one of my ceramic leaf bracelet focals with Niky’s hare clasp and accented it with earthy, fall colors.

The bracelet went through two iterations.   Version 1 is shown below.  Originally I wanted the clasp near the front, hoping it would be more in the spotlight there. I was pleased with version 1 initially.  I took all the bracelet photos for this blog post and went about the rest of my day, wearing my new bracelet.

Rabbit Clasp COM Version 1.jpg

However, the more I wore it, the less I liked it.  It was too bulky and it didn’t drape gracefully on my wrist. It just looked stiff and chunky.

Should I start over, including re-doing all the photos?  Yup, it just wasn’t right and I knew that I would always feel uneasy about it, if I left it as version 1.

Rabbit Clasp COM 2.jpg

Enter Version 2.  Much better.  Some of the bulk in the front was reduced by moving the clasp to the back of the bracelet. I also replaced the bulky and awkward tip drilled pearls, with a double strand of smaller “peanut” beads.

Rabbit Clasp COM 3.jpg

Now there is a focus of interest in both the front and the back. The bracelet curves to the shape of the wrist, rather than standing out at stiff angles.  I’ve said this before, but I think that creating jewelry is like writing an essay.  First you free-write to express all your ideas. Then you go back and do the painstaking work of editing it down to the down to the crystallized essence of your vision.  I hope you can see that process at work here.

Rabbit Clasp COM 4a.jpg

Many thanks to Niky for the opportunity to design with her awesome clasp.  And thanks, also, to my friends at Art Elements for hosting this giveaway and blog hop.

Rabbit Clasp COM 5.jpg

Now please visit all the participants in this blog hop, to see how they have used Niky’s clasp in their own unique designs.

Guest Designers

Linda Landig

Kathy Lindemer

Divya N

Art Element Team

Claire Fabian

Jenny Davies-Reazor

Cathy Spivey Mendola

Susan Kennedy

Caroline Dewison

Lesley Watt

Diana Ptaszynski

Lindsay Starr

Laney Mead

Niky Sayers

Linda cursive

Linda Landig Jewelry
Art Elements COM

This month I’m playing along with Art Elements Component of the Month challenge. The super talented Lindsay Starr, created these innovative leather cabochons. To learn how she made these, you can read about her process here.  The cabochon I received is the second from the left, in the top photo.

option-collage

This was an interesting challenge for me, because I’m not a seed beader, so I couldn’t create a beaded bezel.  Upon further reflection, I realized that I could use some techniques that I learned in a pine needle basketry course that I took about a year ago.

12940697_1188097744548648_894633998_n

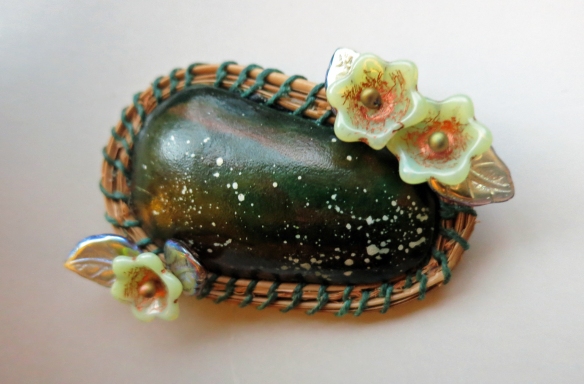
As you can see, the center of my basket is a stone cabochon.  My idea was to use Lindsay’s leather cab in a similar manner, but only weave two rows of pine needles around it and then use it as a brooch or pendant.  I glued a sturdy fabric to the back of the cab and prepared my pine needles.

com-brooch-2a

Using dark green Irish waxed linen, I added the two rows of pine needles.   In the photo below, the second row is close to being finished.  I laid the cab on our glass coffee table and started playing with some different possible embellishments.  When I found a combination I liked, I trimmed the remaining pine needles to a tapered point and wove them in.

com-brooch-4

I used Fire Line to add the flowers and leaves.  I haven’t added any findings yet, as I haven’t decided if this should be a brooch or a pendant.  What do you think?

com-brooch-5

com-brooch-7

I’d position the cab sideways, as above, for a brooch.  If I were to make it into a pendant, I’d position it vertically.

com-brooch-9a

A big thank you to Lindsay for sharing the leather cabochons with us. I also want to thank each of you for visiting my blog.  Now hop on over to the all the other participants and see all the fantastic things that everyone has created.

Guests:

Niky

I am always delighted to read your comments!  Hope to hear from you.

Linda cursiveLinda Landig Jewelry

Save

Save

Save

Save

Muffin Tin Challenge 2017

Life is what happens when you make other plans.  Ever heard that saying?  It pretty much explains what happened to me the past two weeks, in regards to this challenge.  Let me explain.

Heather Powers (Humble Beads) issued her annual Muffin Tin Challenge a couple of weeks ago.  The idea is to kick start your creativity at the start of the new year.  Participants  load up each cup of a muffin tin with all the “ingredients” needed to make a piece of jewelry.  Then whenever you have a spare moment, you can sit down and start creating, without the need to gather material or get distracted by all the other pretties.

I was coming down with a cold, so I decided to make it easy on myself and just use a 6 cup muffin tin, rather than attempting 12 projects.

muffin-tin-challenge-1

My muffin tin.

That cold I mentioned?  Yah, well it quickly morphed into bronchitis.  Which explains why my muffin tin reveal is now a week late.  Even though I missed the deadline for the blog hop, I still felt a sense of commitment to follow through on this challenge.

Before the bronchitis hit me like a tsunami, I got a couple of pieces done.  First up is a pair of earrings that I featured on my Earrings Everyday blog post yesterday.  I ended up making the earrings from the contents of the first two muffin cups. The ceramic spikes are from Suburban Girl Studio and the beaded beads are from Sue Beads.

center-of-attention-4

Then I went on to make a necklace with the Humble Beads bird pendant that you see in the second muffin cup.

garden-bird1a

The rest of the jewelry was made this week. I made these cute earrings next.  They are strung on Irish waxed linen and I macramed the loops at the tops.  The wavy ceramic charms were made by Marsha Neal Studio.  I’m in love with the glaze on these.  See how it shades from mauve to lavender? ❤

mauve-maze-3

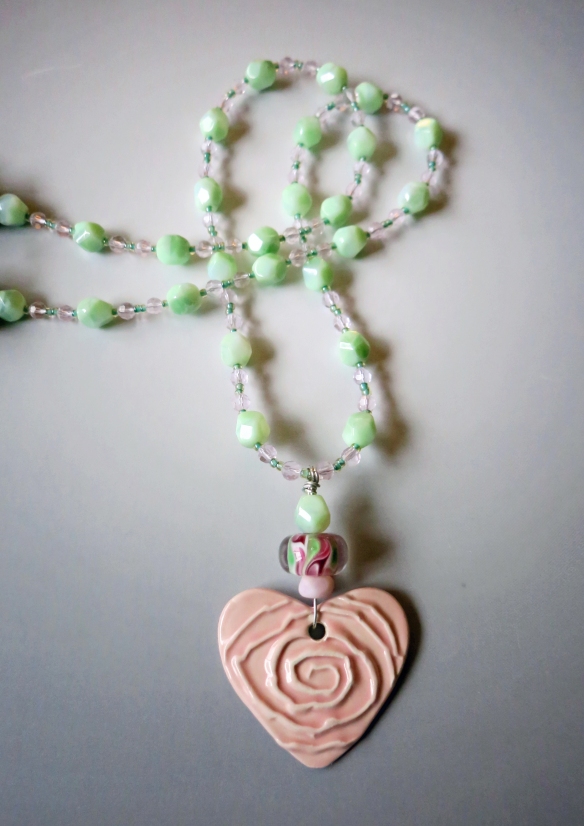
I adore this wonderfully textured heart, by Yoli Miramontes.  I topped it with a  lampwork glass cube, that pulls in the pink from the heart and accents that with mint green.  I’ve been looking for an excuse to use these unusually faceted, mint green beads.  Their time had come to shine!  I interspersed them with tiny green seed beads and transparent pink fire polish beads.  I’m super pleased with this one.

real-love-1b

This next necklace features more ceramic work by Marsha Neal Studio.  I have a huge hoard of Marsha’s work, so I need to focus on designing with her things and then releasing them out into the world, so others can enjoy them.  I topped Marsha’s pendant with a delightful, ceramic bird bead by Caroline Dewison of BlueberriBeads.

blue-bird-necklace-3

And finally, I wrapped up this challenge with these happy, little flower earrings.  Unfortunately, I don’t remember the name of the lampwork artist.

lilac-garden-earrings-3

So I finally finished the Muffin Tin Challenge.  Better late than never.  The first pair of earrings are available in my shop now and I will be adding the others over the next few days.  Thanks for visiting my blog.
I am always delighted to read your comments!  Hope to hear from you.

Linda cursiveLinda Landig Jewelry

Save

Save

Save

Facebook Trunk Show

This Saturday I will be having a trunk show in a wonderful Facebook group called Artisans Create Together.  This group has been a great resource for finding out about jewelry designers and component makers that I’d not known about before.  They’ve also featured old favorites of mine, as well. The primary purpose of the group is to get to know various jewelry artists, but they do have trunk shows too.  I was the featured artist on Wednesday and the info about me is still on the page.  The founder of the group, Janice Everett of J-Lynn Jewels, shared info and photos about my studio spaces, my family and home, as well as my creative journey.

Saturday’s Trunk Show will feature my ceramic jewelry components and my finished jewelry as well as work by Dana Phillips.  Here are some sneak peek at some of my offerings.

trunk-show-collage-ceramic

trunk-show-collage-jewelry

See you at the trunk show on Saturday. Here’s the link: https://www.facebook.com/groups/ArtisansCreateTogether/

Starfish Color Palette Challenge

Towards the end of May, Sherri Stokey put out a challenge on the Love My Art Jewelry blog to design something in this color palette.

I was inspired, although I didn’t play by the rules exactly.  The necklace I designed is beachy and turquoise.  I even included a starfish, however the necklace doesn’t have the neutral colors that Sherry included in her pretty color palette.  My necklace just didn’t seem to want to develop in that direction.
Sea Star Necklace 1
I’m still inspired by Sherri’s color palette though and I’d like to make some additional pieces of jewelry that adhere more closely to her colors.  I made some ceramic clam shell pendants this weekend.  I bisque fired them on Sunday, but they haven’t been glazed yet.  Perhaps I’ll use one of the clam shells to design a necklace in tan, ecru, turquoise and teal.
Some of the items that were bisque fired this weekend –
June 13 2016
I’ll be sure to share further explorations with this theme. In the meantime, my Sea Star Necklace is available in my shop.
Sea Star Necklace 2
Linda cursive